


Now we've all heard of that book, right?
Well, apparently when you give a girl a Sweet Genius marathon, she decides she must have tarts.
(At least this girl)
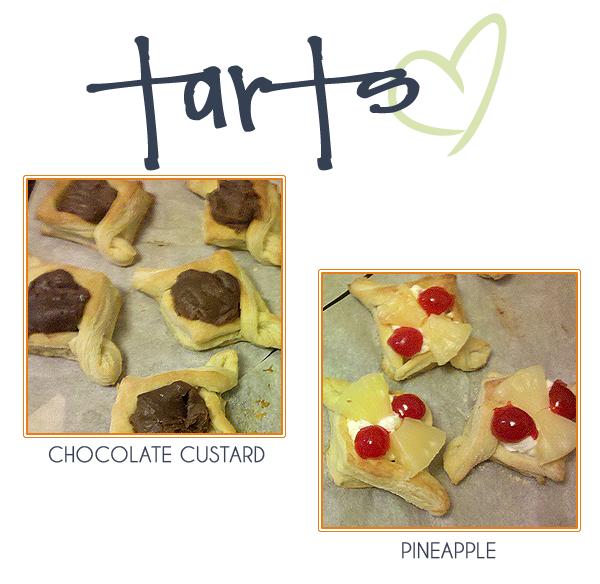
So today I'm going to share with you how I made mine!
We all have that cook book laying around, don't we? (Do correct me if I'm wrong) That one we bought on a whim at some point because it looked like it was just what we needed, and yet there it sits on our book shelves, never touched, hardly opened, and definitely never actually made anything from. Well! Last night was a chance for me to get out there and use that cook book!
This cook book, for me, happens to be Gale Gand's short + sweet: quick desserts with eight ingredients or less. Handy right?
Let me lay the recipe on ya before we continue:
• 4 oz cream cheese, softened
• 2 tablespoons confectioners' sugar
• 1 tsp rum
• 1 sheet of frozen puff pastry, thawed
• 1 can pineapple rings
• marachino cherries, halved
Onwards!
1. To make the filling, whip the cream cheese in a mixer until light and fluffy. Whip in the confectioners' sugar and rum. Refrigerate.
This is also the time I made my custard. Do indeed stir the whole time. Your arm may get tired (mine did). It's a fairly simple thing this custard, and it turned out pretty tasty. I was also proud because I'd never even contemplated making a custard before. Just kind of dove in and prayed I could do it. That's the great thing about my style of baking. I don't really wonder if I can do something, I just get it in my head, and decide to try it. Most days it turns out fairly well!
2. To make the tart shells, dust a work surface lightly with flour and roll over the puff pastry with a rolling pin, pressing lightly to make it a little thinner. You want to end up with a roughly 9x 9-inch square. Refrigerate for about 20 minutes. (makes the dough less stretchy, easier to cut)
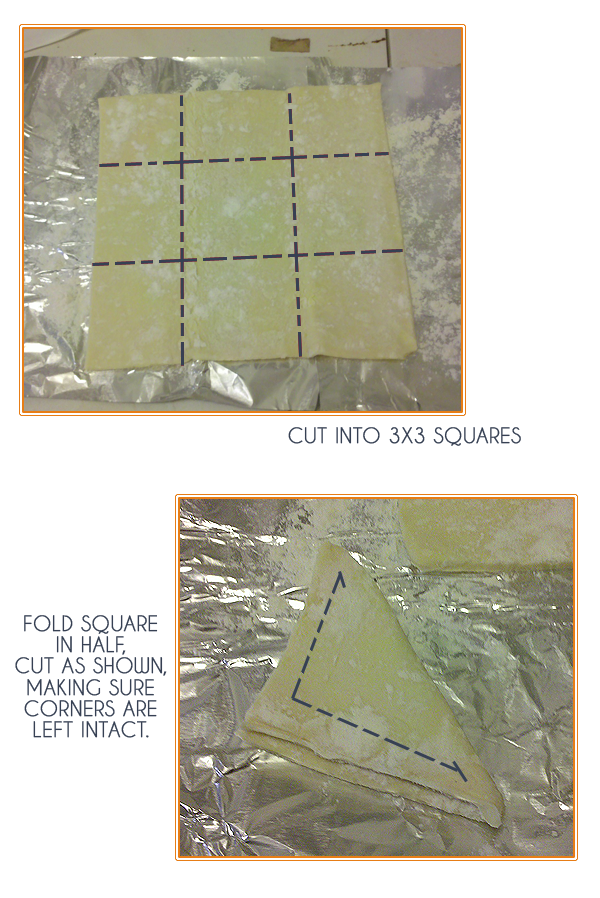
3. Line a sheet pan with parchment paper. Using the tip of a very sharp knife, cut the pastry into 3-inch squares. Fold each square in half diagonally, making a triangle, and cut a band around the edge, 1/4 inch wide, as though you are trying to cut a 1/4 inch frame around the pastry square-- but do not detach the center. Leave the center square connected at the corners.
Lucky for me, my puff pastry came in about a 9x9 inch square. I didn't have to do much rolling. Also the little lines of it folded into thirds made slicing it up a breeze.
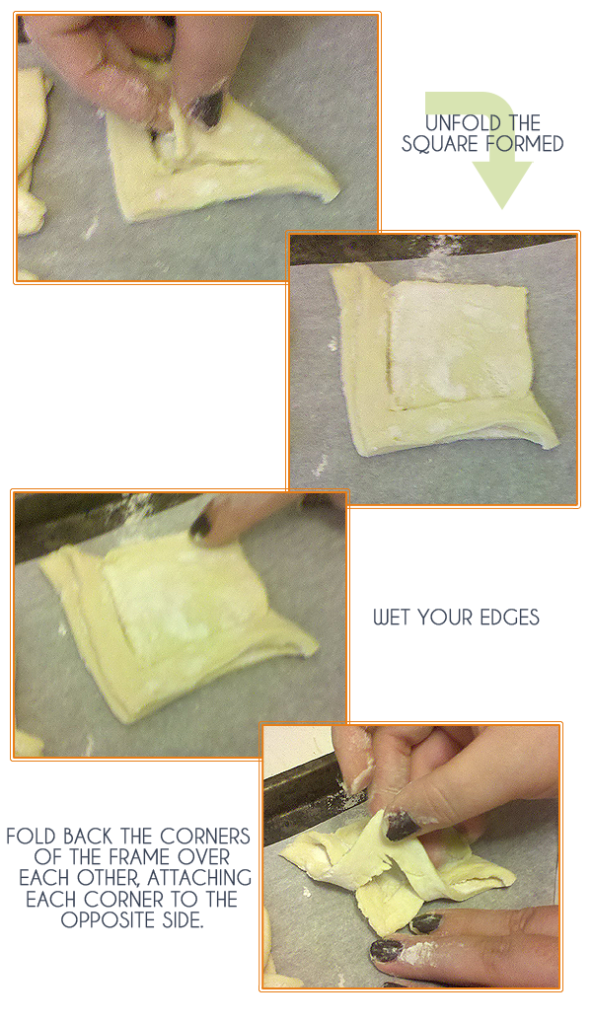
4. Unfold the square on the prepared pan. Paint the edges with water. Fold back the corners of the frame over each other, attaching each corner to the opposite side. Prick the bottom of the tarts and refrigerate for 20 minutes.

5. Meanwhile, heat the oven to 425 degrees. Bake the tarts in the top third of the oven until golden brown, 12 to 15 minutes. Let cool on the pan. If the centers puffed during the baking, press them down to deflate.
I cooked mine for 12 minutes and they were gorgeous. They did puff up a bit and you just give em a little press with your fingertip and voila, perfect little cavity for filling. I was actually surprised how well these turned out, given that I struggled a little with the whole pretty little folding (Mostly due to my lack of great knives).
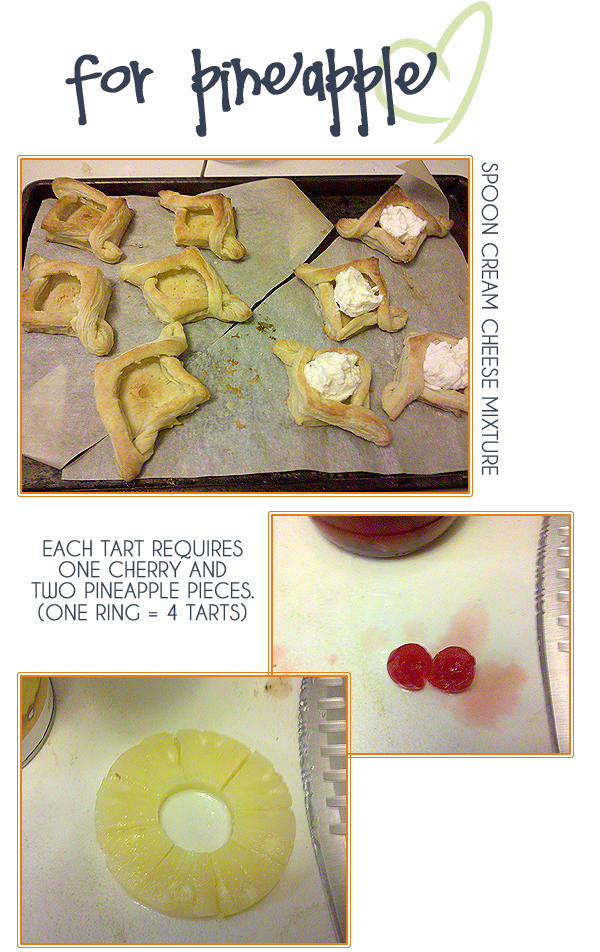
6. Once the tart shells have cooled, and when you are ready to serve, spoon the cream cheese mixture into the centers. Top with sections of pineapple and place half a cherry at opposite corners.
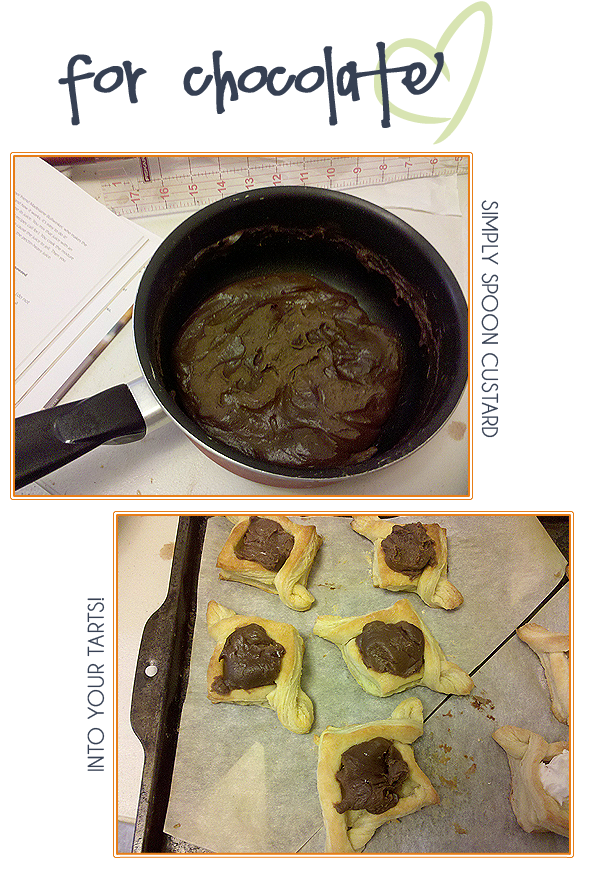
Follow the same procedure with your custard if you have it ;)
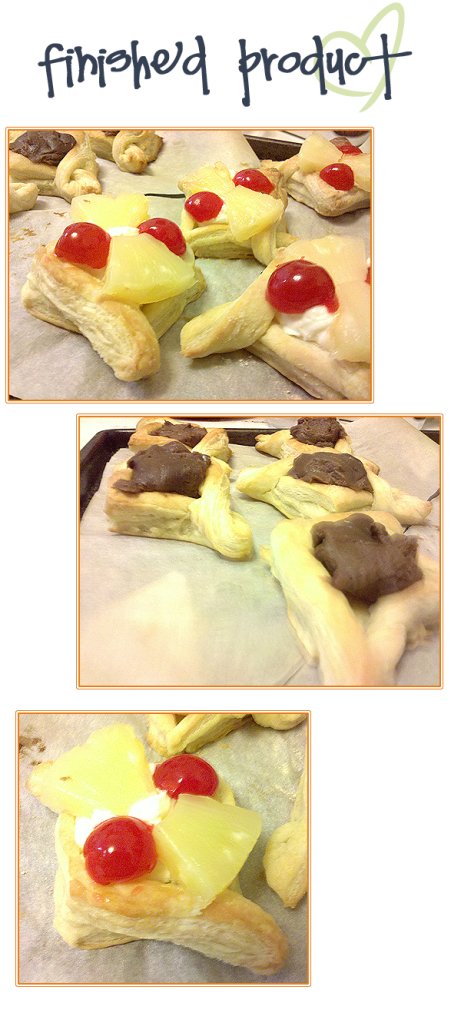
And there you are! The recipe says the tarts should be served within 4 hours. Ours were really fantastic. I'm actually almost sad we didn't make more of the pineapple kind, but my husband wasn't sold on them before I started making them, so he requested a chocolate alternative. (He's not a big cream cheese fan, *GASP*)
But once he actually tried them, he fell in love with the pineapple ones. I had to fight for my two! But all in all, the project turned out really fun and really pretty. I was actually quite proud of how nice they looked.
If you have any questions/feedback, I'd love to hear from you! Hopefully these inspire someone else out there. (Leave me a link to see!) Also, I'll probably be entering these into some of my link ups I haven't been particular active in lately (oops), so don't forget to check those out as well!
I'm a new follower from The Sasse Life hop.
ReplyDeleteGreat blog, nice to "meet" you! :)
Sarah
http://craftingandcreativity.blogspot.ca/
wow, these look great! love the step-by-step pictures :) I think i could actually do this!
ReplyDeleteso glad you think you could do them! I'd love to hear about it if you do!
DeleteSuper great pic's and tutorial on these adorable little tarts:) I so appreciate you linking up to Freedom Fridays! See you next Friday:)
ReplyDelete